Embedded Software Testing with Zephyr RTOS
Introduction
Testing with Zephyr RTOS
In this codelab, we will first understand the basic principles of software testing and, in particular, embedded software testing. We will then experiment with testing by running existing Zephyr RTOS tests with the provided twister test runner. Finally, we will write some simple test applications using the ztest and integrate testing into the GitHub pipeline.
What you’ll build
- You will run existing tests and collect test results in various formats using the twister test runner.
- You will understand how to build your own test programs with the ztest test framework and you will write a few tests.
- You will learn how to deploy your test programs in a CI/CD environment.
What you’ll learn
- The basic principles of embedded software testing.
- How to run tests and check test results with twister.
- How to write your own test programs with the ztest framework.
- How to deploy a CI/CD environment for testing Zephyr RTOS applications.
What you’ll need
- Zephyr Development Environment for developing and debugging your program in C++.
- Zephyr Development Environment for building and running the tests.
- A good understanding of the Zephyr RTOS library architecture and principles.
Embedded Software Testing
Software has become an integral part of many systems, including embedded systems. Each of us interacts with more and more software every day, and solutions are evolving faster and faster. This means incorporating new features as well as improving product stability and security.
For embedded systems, update delivery solutions are often difficult to implement and the pace at which software updates are delivered is much slower than for other systems such as computers or smartphones. However, given the nature of embedded systems, which often operate for long periods of time, software quality is critical and ways of delivering software without compromising quality need to be developed. Automated testing is an important part of solutions aimed at improving software quality. Building, testing and deploying software with many components quickly becomes impossible. In addition, manual testing involves repetitive work and costs time that is not invested in software development. Automating everything - from build to test, deployment and infrastructure - is the only way forward. This is also true for embedded software.
In this context, CI/CD, which stands for Continuous Integration/Continuous Delivery, is a methodology that helps developers deliver applications frequently by introducing automation into the development process. When working in development groups with many developers, continuous integration helps developers merge their code changes back into a shared branch on a regular basis (often daily). Once developers’ changes have been merged, they need to be validated. This is done by automatically building the application and running various levels of automated tests, typically unit and integration tests. If the automated tests find any bugs, they are reported back to the developers so that they can be fixed before a new version of the application is shipped.
When automated builds and tests are successful in CI, continuous delivery allows developers to automate the release of this validated code. From this perspective, CD can only happen in a CI/CD environment where CI is already built into the development pipeline. At the end of the CI/CD process, the application is ready to be deployed into production.
In this codelab we will demonstrate how to run and develop automated tests for your Zephyr RTOS components and application. We will show how to test individual components of a library or application. Tests that integrate multiple components will also be developed.
Motivations for Building an Automated Test Environment
Like any other product used by customers, software needs to be tested before it is delivered to users. Of course, the easiest and most obvious way to test a product is to use it for a while and make sure it behaves as expected. Since the developer knows the application and therefore knows how to quickly test the changes made to it, you might think that this is a reliable way of testing software. Of course, this is usually wrong:
- Developers are biased towards the parts of the software they know best and the changes they have made. It is easy to forget to test some parts, or not realise the impact of a change.
- The environment in which the software runs may be different from the environment of the machine on which it was developed and tested. Very often the environment has an impact on the way a particular piece of software can run.
- Last but not least, testing is a boring and time-consuming task. Very often, developers will minimise the time they spend on testing. In some situations, people are hired to perform testing activities, but the problem remains.
Even in situations where developers and testers are two different groups of people, the disadvantage is that developers are no longer involved in testing and may lose sight of the big picture. On the other hand, testers have little knowledge of the changes that have been made and have to bother the developers whenever they find something they don’t understand.
Modern software development also requires the ability to change code quickly and safely. From this perspective, automated testing plays a key role, together with a clearly defined testing strategy that includes different types of tests. In general, tests range from unit tests, which focus on technical details, to acceptance tests, which show that the application meets its objectives. More details on the different types of tests are given in the next section. So tests can be different, but good tests tend to share the same characteristics:
- A good test is deterministic: it doesn’t matter where and when it runs, it should always produce the same outputs given the same inputs. It must also be verifiable. Of course, this sometimes makes the task of writing tests difficult.
- A good test is fully-automated: because it must be repeated endlessly, and because machines are good at repetitive tasks, tests must be performed as automated tasks by a machine.
- A good test is responsive: it must provide fast and direct feedback. Integrating test feedback into the development process is essential and must be done quickly and efficiently.
You should also be aware that
- Testing does not slow down development: in the long run, the time spent writing tests is an investment that allows changes to the software to be made in an efficient and robust way.
- Testing is not just about finding bugs: finding bugs is an important purpose, but making bugs easily detectable and fixable after each and every change is even more important. This gives developers a safety net that makes it easier to make changes to the software. Without a safety net, developers would only make very conservative changes, while some less conservative changes may be needed.
The Test Pyramid
The concept of the test pyramid was introduced by Mike Cohn in his book “Succeeding with Agile”. The concept is particularly applicable to applications with a user interface, but can easily be adapted to embedded software.
In Mike Cohn’s original concept, the test pyramid consists of three layers that any test suite should consist of (image taken from Test Pyramid in Spring Boot Microservice):
- User Interface or System Tests
- Service or Integration Tests
- Unit Tests
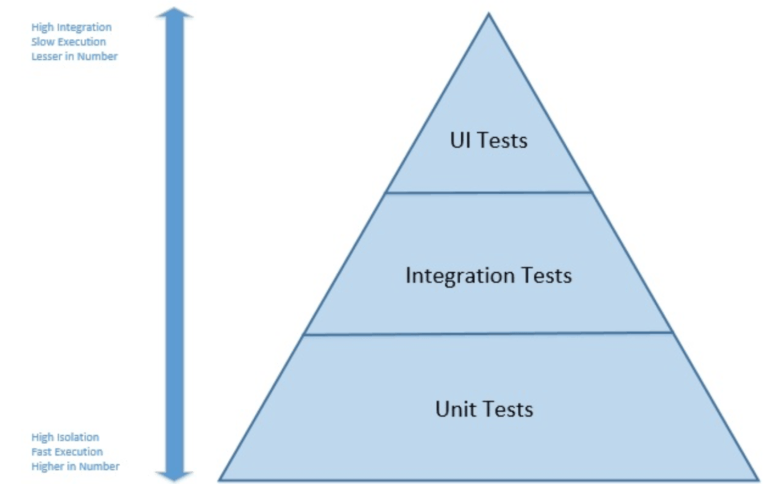
When applied to embedded systems, it is not possible to adopt this concept strictly, either in the number of layers or in the naming of the layers. However, because of its simplicity, the essence of the test pyramid is a good basis on which to build an embedded software test suite. In particular, you should try to
- Write tests with different granularities
- Adapt the number of tests to their level: low-level tests require many tests while fewer tests are needed for high-level tests.
In other words, develop a test suite with lots of small and fast unit tests. You should also write a reasonable number of integration tests and very few system tests that test your application from end to end.
Test Specification in Zephyr RTOS
In Zephyr RTOS, tests can be run on standard applications or on specific test
applications. In the former, tests are specified in a sample.yaml file located
in the application directory. Test applications use a testcase.yaml file
located at the root of the test application directory. In this codelab, we only
address the case of test applications.
One simple example of a testcase.yaml file is shown here:
common:
  ignore_faults: true
  tags:
    - kernel
    - threads
    - userspace
tests:
  kernel.threads.apis:
    min_flash: 34
  kernel.threads.apis.pinonly:
    min_flash: 34
    depends_on:
      - smp
    extra_configs:
      - CONFIG_SCHED_CPU_MASK_PIN_ONLY=y
Full details about the syntax used in testcase.yaml files can be found
here.
Although the nomenclature used in testing with twister can be confusing, the
important points are as follows:
- Test application configurations are written using the YAML syntax.
- Configuration files may contain one or more entries in the
testssection, each of which identifies a test scenario. An example of a test scenario is thekernel.threads.apisin thetestcase.yamlfile shown above.kernel.threads.apisis a key in YAML syntax and it is the test scenario identifier. - A test scenario is a set of conditions and variables, such
min_flash: 34. This set of conditions and variables guides how test suites will be built and executed. - A test suite is a collection of test cases and a test case is the smallest test unit, often implemented as a single test function.
We will not explain the meaning of the different fields contained in the
testcase.yaml file here. Instead, we will rather explain the fields when we build our
own testcase.yaml file. First, however, we will learn how to use
twister to run tests written in the Zephyr RTOS repository.
Start Testing
The first thing you need to do when setting up a testing environment and strategy for your application is to start testing the existing source components. What does that mean on the Zephyr RTOS platform?
The Zephyr RTOS platform provides several tools to assist in the development of an appropriate test suite:
- Unit tests can be developed and built using a separate build system. Unit tests are built and run on the host/development machine and have no hardware or software dependencies.
- ztest is the test framework used to write test programs and is provided as part of the Zephyr RTOS platform. With this framework, developers can write functional unit tests in C/C++, but also integration tests that can implement complex use cases that run on microcontrollers.
- twister is the test runner provided as part of the Zephyr RTOS platform. With twister, you can build and run test programs on physical boards or emulated environments.
Discovering and Running Existing Tests
This section explains how to use twister to build and run test programs that are part of the Zephyr RTOS library, both on physical boards and in emulated environments. The use of twister is extensively documented here.
The first initial steps for building and running tests are the following:
- You can list all tests that are available for a specific platform with
terminalassuming that all dependencies have been installed in the
west twister --list-tests -T deps -p nrf5340dk/nrf5340/cpuappdepsfolder. - You can limit the tests to list or run by specifying a tag value. For example,
if you want to limit the list of tests to those tagged with
cpporkernel, you can add-t cppor-t kernelto the command. If you limit the tests tocpp, you should see that somezpp_libtests are listedconsole... - zpp_lib.zpp_rtos.zpp_mutex.mutex_lock_unlock - zpp_lib.zpp_rtos.zpp_semaphore.semaphore_release_acquire ... - You can then select one of the tests and compile it for the chosen platform by
running, for example,
terminalUnless the selected test is not supported for the target board, the test program should compile.
west twister --build-only -T deps/zpp_lib/zpp_rtos -p nrf5340dk/nrf5340/cpuapp
Running the above commands will show you that all the output files generated by
twister are stored in a folder called twister-out. Older folders are
automatically renamed to twister-out.X (e.g. twister-out.1) when a new test
is run. You can specify a different folder for the results by adding the -O
OUTDIR option to any twister command, in which case the OUTDIR folder will be
cleared before the test begins.
Running Tests on Physical Device
Note
Do not connect to your physical device when running twister. twister requires to access the physical device using the serial connection (via USB) and it will fail if you are already connected using a serial terminal for instance.
For running tests on a physical device, you may choose of the following options:
- Run the test on a single device with the command
terminalwhere “COM_PORT” is the serial port to which your device is connected.
west twister -T deps/zpp_lib/zpp_rtos -p nrf5340dk/nrf5340/cpuapp --device-testing --device-serial "COM_PORT" -
Run the test on a single or several devices by first building a device map:
-
Run the following command:
terminalThis will probe the serial devices connected to your computer and generate a hardware map file such as:west twister --generate-hardware-map my_map.yamlmy_map.yamlYou need to update the content of the file with the missing information, such as:- connected: true id: 0038001F3431511037393330 platform: unknown product: unknown runner: unknown serial: COM5 (on Windows) or /dev/ttyACM0 (on Linux) - connected: true id: null platform: unknown product: unknown runner: unknown serial: COM6 - connected: true id: null platform: unknown product: unknown runner: unknown serial: COM7my_map.yamlIf you have more than one device connected to your computer, you will need to update the file for each specific entry. Also note that you may need to update the file to match connection status and ports as you connect and reconnect devices to your computer. Your- connected: true id: 0038001F3431511037393330 platform: nrf5340dk/nrf5340/cpuapp product: J-Link runner: nrfutil serial: COM5 (on Windows) or /dev/ttyACM0 (on Linux)nrf5340dk/nrf5340/cpuappdevice will also most probably display two connected serial ports and you need to select the proper one. -
Once the hardware map file has been updated correctly, you may run
terminalfor executing tests on one or several devices connected to your computer.west twister -p nrf5340dk/nrf5340/cpuapp -T deps/zpp_lib --device-testing --hardware-map my_map.yaml
-
Running Tests on Emulated Device
With twister and Zephyr RTOS it is possible to run test programs on emulated devices. In the getting started codelab, you learned the installation, configuration and run on a emulated device.
Test programs may also be run on an emulated platform as follows:
* The test program should include the proper definitions for the boards/qemu_x86.conf and boards/qemu_x86.overlay files in
the boards folder in the application folder. This is the case for instance for the zpp_lib test programs.
* If you run west twister -p qemu_x86 -T deps/zpp_lib/zpp_rtos/tests --integration, you should observe that
the zpp_lib test programs are executed successfully on the qemu_x86 device.
Running Test Programs as Standard Zephyr RTOS Programs
When developing a software, it can be useful to run test programs outside the
twister test framework. This is easy to do since any test program is a
standard Zephyr RTOS program. For example, you can build this test program
using west build deps/zpp_lib/zpp_rtos/tests/mutex and flash your device.
The main difference is that the test results won’t be collected. However,
you can view the test results by opening a serial terminal as you would do
for any application.
When running test programs outside the test framework, it is, of course, only possible to build and run one test program at a time. Unlike with Twister, you cannot specify a number of test programs to be run.
Note that one difference when using the ztest framework as compared to a
standard Zephyr RTOS application is that the test function is not executed
from the main thread but rather from a dedicated thread with priority -1.
Writing Your Own Test Programs
The framework we experimented with in the previous section enables us to write our own test programs. The simplest method for this purpose is to use the Zephyr RTOS Test Framework ztest. This framework provides assertion macros and a generic test structure that are useful for this purpose.
Test programs can be placed anywhere in the application directory structure, but
it is common to place them in a folder named “tests”. In any case, tests are
identified by the presence of a testcase.yaml file that describes the various
test scenarios.
Write A Simple Test Program That Always Succeeds
Our first test program will be very simple and it will allow us to discover the most important features of the test frameworks. Note that a Zephyr RTOS test program is a standard Zephyr RTOS application, with a number of differences compared to other Zephyr RTOS applications, which we will explain below.
The steps for developing your first test program are as follows:
- Create a new application with
just create-app simple_tests/tests/always_succeed. - Modify the name of the application in the
CMakeLists.txtfile. -
In the application folder, add a file named
testcase.yaml. This file defines the test scenarios and is included for all test applications. In our case, the file content is as simple as:simple_tests/tests/always_succeed/testcase.yamlThis file defines a single test scenario with the identifiertests: simple_tests.always_succeed: tags: - cpp extra_conf_files: - ../../deps/zpp_lib/configs/prj.conf - ../../deps/zpp_lib/configs/prj_log.conf - ../../deps/zpp_lib/configs/prj_debug.conf - ../../deps/zpp_lib/configs/prj_test.confsimple_test.always_succeed. This test scenario uses acpptag to allow tests to be filtered based on this specific tag. -
The test framework is enabled by adding the
prj_test.confas extra configuration file in the build process. This file contains the following definition:simple_tests/tests/always_succeed/prj_test.conf# enable the test framework CONFIG_ZTEST=y ... - When running tests, the use of extra configuration files can be done by adding these additional files
in the
testcase.yamlfile. A required extra configuration file isprj_test.confas defined in the existingtestcase.yamlfile. - The
always-succeedtest can be implemented as follows in thesrc/main.cppfile:
simple_tests/tests/always_succeed/src/main.cpp
// Copyright 2025 Haute école d'ingénierie et d'architecture de Fribourg
//
// Licensed under the Apache License, Version 2.0 (the "License");
// you may not use this file except in compliance with the License.
// You may obtain a copy of the License at
//
//     http://www.apache.org/licenses/LICENSE-2.0
//
// Unless required by applicable law or agreed to in writing, software
// distributed under the License is distributed on an "AS IS" BASIS,
// WITHOUT WARRANTIES OR CONDITIONS OF ANY KIND, either express or implied.
// See the License for the specific language governing permissions and
// limitations under the License.

/****************************************************************************
 * @file test.cpp
 * @author Serge Ayer <serge.ayer@hefr.ch>
 *
 * @brief Test program for demonstrating the basic test features
 *
 * @date 2025-07-01
 * @version 1.0.0
 ***************************************************************************/

// zpp_lib
#include "zpp_include/zpp_assert.hpp"
#include "zpp_include/zpp_test.hpp"

ZPP_ZTEST(always_succeed, test_equality) {
  // this is the always succeed test
  zpp_zassert_true(4 == 2 * 2);
}

ZPP_ZTEST_SUITE(always_succeed, nullptr, nullptr, nullptr, nullptr, nullptr);
Note that often the file containing the test scenario implementation is often named test.cpp
rather than main.cpp. However, this is not mandatory and it is sufficient for the file to contain
the required test scenario definitions. In our case, it also helps to keep the same nomeclature for the use of justfile.
This test program uses two macros:
-
ZPP_ZTEST_SUITEorZTEST_SUITEcreates a test suite to which you can add test cases/functions. In this example, the only parameter used is the suite name (note that it has not been stringified yet). The meaning of the other parameters is described here. -
ZPP_ZTESTorZTESTcreates a new test and attaches it to the declaredalways_succeedtest suite.test_equalityis the name of the test function created by this definition, which will be called when the test suite is executed.
To run the test, first, modify the name of the hardware map file that you are using in the justfile. Then,
ensure that no serial connection is active for your nrf5340dk/nrf5340/cpuapp device. Use just test simple_tests
to perform the test on the nrf5340dk/nrf5340/cpuapp device. Alternatively,
you can run the tests on qemu_x86 by using just test-qemu simple_tests.
You should see a successful result like this:
INFO    - Total complete:    1/   1  100%  built (not run):    0, filtered:    0, failed:    0, error:    0
INFO    - 1 test scenarios (1 configurations) selected, 0 configurations filtered (0 by static filter, 0 at runtime).
INFO    - 1 of 1 executed test configurations passed (100.00%), 0 built (not run), 0 failed, 0 errored, with no warnings in 41.78 seconds.
INFO    - 1 of 1 executed test cases passed (100.00%) on 1 out of total 1115 platforms (0.09%).
INFO    - 1 test configurations executed on platforms, 0 test configurations were only built.
The simple always-succeed example does not utilize some important
configuration features for tests. In particular, ZTEST_SUITE can be called
using the following syntax ZTEST_SUITE(SUITE_NAME, PREDICATE, setup_fn,
before_fn, after_fn, teardown_fn) where:
PREDICATEis a function to test against the state and determine if the test should run.setup_fnis the setup function to call before running this test suitebefore_fnis the function to call before each unit test in this suiteafter_fnis the function to call after each unit test in this suiteteardown_fnThe function to call after running all the tests in this suite
This set of functions enables highly flexible configuration of test suites.
Test a basic C++ component
One important feature in the C++ language is the concept of smart pointers. Unlike raw pointers, smart pointers are designed to ensure that programs free memory and resources when they are no longer referenced any more. This mechanism thus prevents memory and resource leaks. It is also exception-safe, meaning that the expected behavior is also guaranteed in the case of an exception.
In this section, we demonstrate how the behavior of raw and smart pointers
can be tested. Raw pointers simply behave as addresses to memory locations and
with raw pointers, so it is the programmer’s responsability to deallocate
any memory space allocated with a new or a malloc. In contrast, smart
pointers allow memory allocation to be encapsulated within classes, ensuring that memory
is released whenever the object encapsulating the memory buffer is destroyed.
Smart pointers are now implemented as part of the C++ standard using the
std::unique_ptr or the
std::shared_ptr classes.
std::unique_ptr and std::shared_ptr both implement mechanisms for a proper
deallocation of the encapsulated resource. However, they differ in the way they
handle the ownership of the resource:
- With
std::unique_ptronly one variable can refer to the object and the allocated resource will be reclaimed when that variable is destroyed. Transfering the ownership of the resource cannot be done with the assignment operator (operator=()) and instead one must use thestd::move()semantics. - With
std::shared_ptr, the ownership of the resource can be shared among several variables. A reference counting mechanism is implemented and when the last reference to the resource is destroyed, then it is reclaimed. Be aware that circular references are possible withstd::shared_ptr.
For testing the behavior of both raw and smart pointers, we use a simple
Test structure, with the following definition:
struct Test : public zpp_lib::NonCopyable<Test> {
  Test() : _value(kMagicNumber) {
    s_instance_count++;

  }

  ~Test() {
    s_instance_count--;
    _value = 0;
  }

  int _value = 0;
  static constexpr uint32_t kMagicNumber = 33;
  static inline std::atomic<uint32_t> s_instance_count = 0;
};
This structure contains a static attribute that counts the number of live
instances, by incrementing/decrementing it upon construction/destruction. With
this mechanism, we can test the following behaviors:
- Test that a shared pointer created in a given scope will be destroyed when the scope is left. When the pointer is destroyed, the memory it encapsulates will be freed.
- Test that multiple instances of shared pointers correctly manage the reference count and that the object is released correctly.
- Test that when creating a raw pointer and deallocating it correctly, the destructor is called.
The tests described above can be integrated in a new test program simple_tests/tests/ptr_test.
The test program is given below:
simple_tests/tests/ptr_test/src/main.cpp
// Copyright 2025 Haute école d'ingénierie et d'architecture de Fribourg
//
// Licensed under the Apache License, Version 2.0 (the "License");
// you may not use this file except in compliance with the License.
// You may obtain a copy of the License at
//
//     http://www.apache.org/licenses/LICENSE-2.0
//
// Unless required by applicable law or agreed to in writing, software
// distributed under the License is distributed on an "AS IS" BASIS,
// WITHOUT WARRANTIES OR CONDITIONS OF ANY KIND, either express or implied.
// See the License for the specific language governing permissions and
// limitations under the License.

/****************************************************************************
 * @file test.cpp
 * @author Serge Ayer <serge.ayer@hefr.ch>
 *
 * @brief Test program for demonstrating the basic test features
 *
 * @date 2025-07-01
 * @version 1.0.0
 ***************************************************************************/

// std
#include <atomic>
#include <memory>
#include <utility>

// zpp_lib
#include "zpp_include/non_copyable.hpp"
#include "zpp_include/zpp_assert.hpp"
#include "zpp_include/zpp_test.hpp"

// Structure used for testing instance counts
// We inherit from zpp_lib::NonCopyable to prevent accidental copies of the Test class
// cppcoreguidelines-special-member-functions is therefore a false positive
// NOLINTNEXTLINE(cppcoreguidelines-special-member-functions)
struct Test : public zpp_lib::NonCopyable {
  Test() : _value(kMagicNumber) {
    s_instance_count++;
  }

  ~Test() {
    s_instance_count--;
    _value = 0;
  }

  int _value                                           = 0;
  static constexpr uint32_t kMagicNumber               = 33;
  static inline std::atomic<uint32_t> s_instance_count = 0;
};

/**
 * Test that a shared pointer correctly manages the lifetime of the underlying raw pointer
 */
ZPP_ZTEST(ptr_test, test_single_sharedptr_lifetime) {
  // Sanity-check value of instance counter
  zpp_zassert_equal(0, Test::s_instance_count);

  // Create and destroy shared pointer in given scope
  {
    std::shared_ptr<Test> shared_ptr = std::make_shared<Test>();
    zpp_zassert_equal(1, Test::s_instance_count);
    zpp_zassert_equal(Test::kMagicNumber, shared_ptr->_value);
  }

  // Destroy shared pointer
  zpp_zassert_equal(0, Test::s_instance_count);
}

/**
 * Test that multiple instances of shared pointers correctly manage the reference count
 * to release the object at the correct point
 */
ZPP_ZTEST(ptr_test, test_instance_sharing) {
  std::shared_ptr<Test> shared_ptr1(nullptr);

  // Sanity-check value of counter
  zpp_zassert_equal(0, Test::s_instance_count);

  // Create and destroy shared pointer in given scope
  {
    std::shared_ptr<Test> shared_ptr2 = std::make_shared<Test>();
    zpp_zassert_equal(1, Test::s_instance_count);
    // share share_ptr2 with shared_ptr1
    shared_ptr1 = shared_ptr2;
    // still one instance only
    zpp_zassert_equal(1, Test::s_instance_count);
    zpp_zassert_equal(Test::kMagicNumber, shared_ptr1->_value);
    zpp_zassert_true(shared_ptr1.get() == shared_ptr2.get());
  }

  // shared_ptr1 still owns a raw pointer
  zpp_zassert_equal(1, Test::s_instance_count);

  shared_ptr1 = nullptr;

  // shared pointer has been destroyed
  zpp_zassert_equal(0, Test::s_instance_count);
}

/**
 * Test that multiple instances of unique pointers correctly manage the
 * ownership of the the object
 */
ZPP_ZTEST(ptr_test, test_unique_ptr) {
  // TO DO(student): implement this test based on the exercise description
}

/**
 * Test that when delete is not called with a raw pointer then a memory leak occurs
 */
ZPP_ZTEST(ptr_test, test_raw_pointers) {
  // TO DO(student): implement this test based on the exercise description
}

ZPP_ZTEST_SUITE(ptr_test, nullptr, nullptr, nullptr, nullptr, nullptr);
Exercice: Write a test program for unique_ptr
Exercice: Write a test program for raw pointers
Stack size for Test Programs
When running tests, the test framework executes tests using a separate thread.
The stack size of this separate thread can be configured using the CONFIG_ZTEST_STACK_SIZE configuration parameter.
The provided prj_test.conf file overrides the default configuration by setting CONFIG_ZTEST_STACK_SIZE=8192.
Integrating Tests in CI
In the improving software quality codelab,
you already integrated pre-commit into a GitHub workflow. In this codelab, we show how to create workflows that
will run twister tests on GitHub.
Automating the test process requires running the ztest suite on a real or
emulated board. GitHub CI/CD does not necessarily provide a runner that matches
the nrf5340dk/nrf5340/cpuapp device. However, the Zephyr SDK (available on Linux and
macOS) includes QEMU, which makes it possible to emulate a board (here
qemu_x86) and run the tests.
The goal here is to demonstrate how you can automatically build your applications and how you can automate tests.
Integrate the Test Stage
In the previous step, we have developed a number of test programs. To automate test builds and twister runs, we will now integrate them into the GitHub Actions. With GitHub Actions, one can automatically build, test, and deploy any application.
To do this, we run a dedicated workflow on GitHub, as follows:
Workflow file definition
name: Test AES workspace

on:
    # push:               # Run the workflow on every push to any branch
    # pull_request:       # Run the workflow on every pull request
    workflow_dispatch:  # Allow manual triggering from the GitHub Actions UI

jobs:
  build-apps:
    uses: AdvEmbSof/common-workflows/.github/workflows/build-zephyr-apps.yml@main
    secrets:
      personal_access_token: ${{ secrets.ADVEMBSOF_2026_2027 }}
    with:
      configuration_file: 'ci/applications_for_build.yaml' # file where build parameters are defined

  test-apps:
    uses: AdvEmbSof/common-workflows/.github/workflows/twister-tests.yml@main
    secrets:
      personal_access_token: ${{ secrets.ADVEMBSOF_2026_2027 }}
    with:
      configuration_file: 'ci/applications_for_test.yaml' # file where test parameters are defined
    permissions:
      checks: write
      pull-requests: write
      contents: read
This workflow file includes the definitions of two jobs named build-apps and test-apps.
These jobs can be executed on push (commented), pull request (commented) or manual dispatch. Their configurations are as
follows:
-
The
build-appsjob uses a reusable workflows namedbuild-zephyr-apps.yml:- This action is stored in the
AdvEmbSof common-workflowsrepository, which is a private repository. The secrets specified for the job allows to access the reusable workflow. - This workflow setups the Zephyr RTOS build environment and builds the defined applications for the defined boards.
- It accepts one input,
configuration_file, that defines the path to the configuration file used to run the workflow. -
The configuration file has the following syntax:
ci/applications_for_build.yamlThis syntax allows to configure the build of several applications, for different boards and with specificapplications: - app: blinky boards: - nrf5340dk/nrf5340/cpuapp specs: log+debug+gpio - app: bme280 boards: - nrf5340dk/nrf5340/cpuapp - qemu_x86 specs: log+debug+sensorspecs. -
These inputs are expanded into a matrix, so the job runs for each combination and executes
As an example, for the configuration file described above, three different builds will be run, one for thepython deps/zpp_lib/scripts/build.py --app "application" --specs "specs" --board "board" --pristineblinkyapplication and two for thebme280application.
- This action is stored in the
-
The
test-appsjob uses the reusable workflowtwister-tests.yml.- This action is stored in the
AdvEmbSof common-workflowsrepository, which is a private repository. The secrets specified for the job allows to access the reusable workflow. - Instead of building applications, it runs Zephyr RTOS’s Twister test framework.
- It accepts one input,
configuration_file, that defines the path to the configuration file used to run the workflow. -
The configuration file has the following syntax:
ci/applications_for_test.yamlThis syntax allows to configure several twister runs, for different test roots and with different test tags.tests: - root: simple_tests tags: cpp - root: bike_computer/tests tags: phase_A -
These inputs are expanded into a matrix, so the job runs for each combination and executes
As an example, for the configuration file described above, two different twister runs will be executed, one for eachpython deps/zpp_lib/scripts/twister.py --root "root" --tags "tags" --board qemu_x86 \rootspecified.
- This action is stored in the
As it is configured, the aes-test-yml workflow will only be run on request.
If you wish to run tests on push or pull on request, you may modify the aes-test.yml file
and remove the corresponding comments. You may also restrict branches on which actions must be executed.
Whenever the runner runs a job, the job results are displayed in the actions tab.
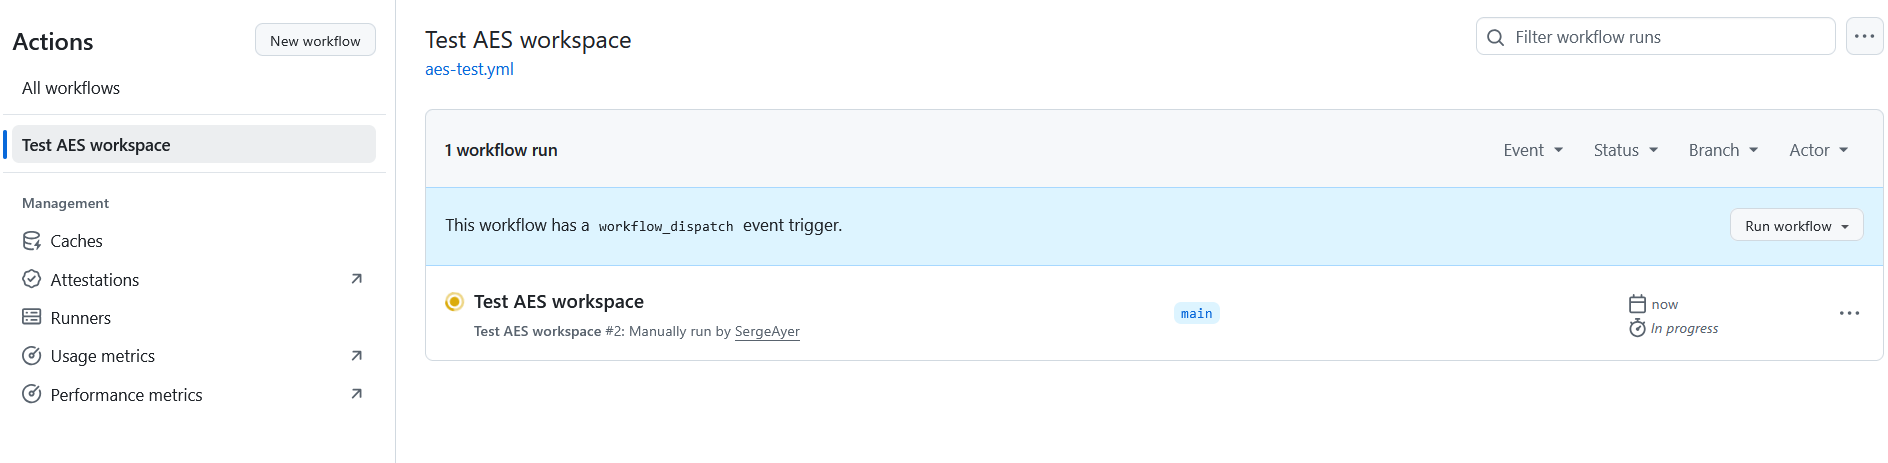
The picture above shows the details of the Build test workflow. You can follow the workflow progress by choosing a specific run:
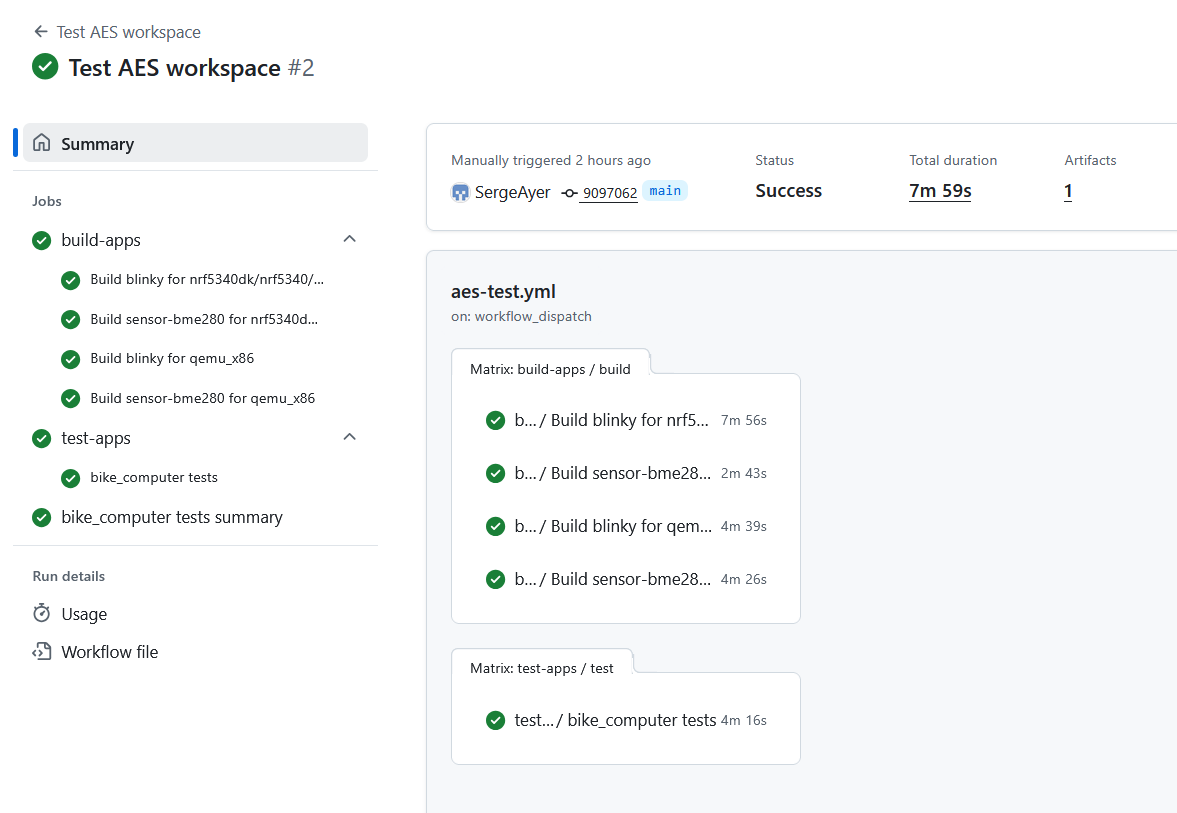
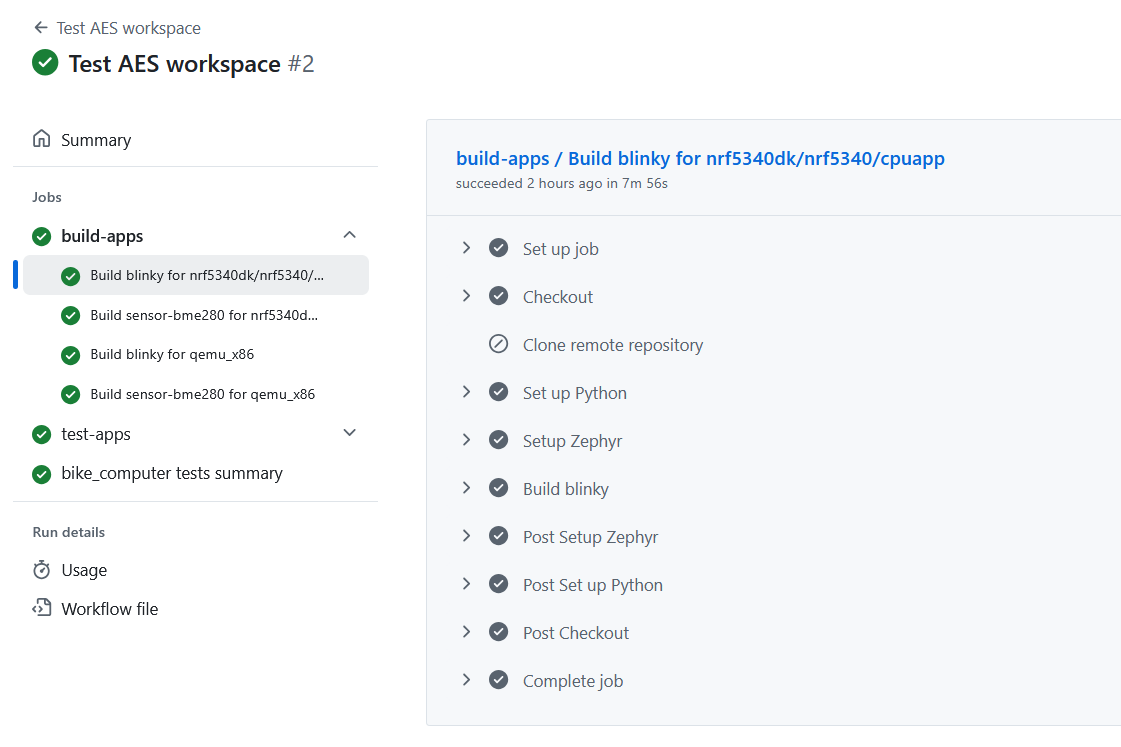
If you select a particular job, you can see all the details. If a job fails, you can also read the log to understand the problem and fix it.
Configure your Workflow
Depending on your specific needs, you may adapt the workflow file as follows:
- Modify the events that trigger the workflow by editing the
onkey. - Modify the
workflow_dispatchkey by adding properties that can be edit in the GitHub UI when dispatching a workflow. - You may select whether you want to run both
build-appsandtest-appson each event or whether you want to run only one specific job.
Wrap-Up
By the end of this codelab, you should have completed the following steps:
- Understand how to list and run existing Zephyr RTOS tests using twister.
- Understand how to write your own tests using ztest.
- Write and run successfully the unit tests as specified here.
- Deploy the developed tests on your GitHub repository.
- Understand and successfully deploy the
aes-test.ymlworkflow. - Understand how to run workflows from your repository.
Deliverables
Deliverables/Requirements (Project Phase A)
The deliverables/requirements for project Phase A include the following:
-
The test case as defined here have been added to the corresponding test scenarios and are available on your GitHub repository.
-
The following hooks are added to the
pre-commitconfiguration: id: clang-tidy-always-succeed-
id: clang-tidy-ptr-testpre-commitruns successfully. -
The
aes-test.yamlworkflow file and the associated build and test configuration files are added to your GitHub repository. -
All applications build successfully with the
aes-test.yamlworkflow. -
The
simple_teststests as described in this codelab run successully with theaes-test.yamlworkflow.